HAPPY NEW YEAR 2016


Happy New Year's Eve everyone! 
I wanted to take a moment and wish you and yours  a HAPPY NEW YEAR!!
Have FUN, BE SAFE!
Thank you for a great 2015!  Superteach is looking forward to many great things in 2016. I appreciate you being supportive and following along as we look at ways to teach kids with special needs. 


Before you go out celebrating- take a quick look at a new product that just got put up at the Superteach's TPT store. Lets start the new year off with a 1/2 price sale on new winter items in my store. The item below is one. Starting at 12PM EST 12/31/15 my new items will be half off. That means you could get the item below for $1.50.

Do you ever have that student or couple of students that really have a hard time learning to count? They are getting older every year but you need something new to reteach the numbers or just to give extra practice in independent work time or center time. Well here is something that is easy to make and easy to use.


Its a counting practice book but it has some substance to it for use with those kids a little older still working on mastering counting. This book is a winter edition and is all about Penguins.
This is an interactive book that is great for practicing counting number from 0-20 PLUS its a WINTER edition so its all about penguins; Rockhopper penguins to be exact. Your students will reading about these great little penguins that jump out of the water and slide on their stomachs onto ice. They can read about the penguins and practice their counting all at the same time.

The kids read (or have read to them) the penguin fact, count the penguins, then find the number card that matches the number of  penguins on that page and attach it to the answer square.

Heres is a quick look  video.


0

Science Made Easy

My last blog for 2015! While it is my last of 2015, it is 1st blog post with my new design. Hurray! Its been a long time coming but I finally dove in and did it; with some help.
Drop me a comment and let me know what you think.


Its amazing to to think I have been blogging for a little over 2 years now.  I am so excited to be able to share ideas things that have and haven't worked in my classroom  and of course just ramblings of my brains with you about teaching these great kids we serve.


I am so glad you have joined me today! Come on in and lets share ideas.
Science has always been one of my favorite subjects. For many years, I didn't teach very much Science as I taught in a resource room and focused primarily on Reading, Math Spelling, Language. The students returned to their general education classrooms for Science and Social Studies.
When I began teaching in a self contained classroom, I taught all the subjects. I found I needed a way to bring Science to my kids at a level they could participate, enjoy (a.k.a. learn and not know it) and have fun. It also needed to be presented in such a way that kids on multiple levels could participate and get the most out of the lesson they possible could.
One way that worked for me was to bring as many experiments into the classroom as possible. Talking and lecturing to kids with disabilities for Science and letting them observe the experiments wasn't something that was going to be very beneficial to me or my students.
I made Super Science Task Cards.

These cards have simply stated direction for setting up experiments independently or in groups. They give the students the ability to do each step they can handle by themselves. 
This is a freebie of my Science Experiment Cards set that will come out in the next few week. Over the years I have created quite a few of these and used them with my students. At times we did them together as a group and other times, we  did the experiments at a Science Center. The difficulty level student ability age, ability levels and materials needed all drive how I utilized the cards with each particular set of students.
The cards are kept simple in decoration and design so that the focus remains on the reading the science experiment steps with the best comprehension of what is supposed to be done. 

Other experiment cards coming soon:
Seed Planting
Growing Crystals
Root systems

Be sure and check out the freebie by clicking on the title page above. 
Drop me a comment below or at superteach56@gmail.com if you have experiments you would like added.
Have a GREAT New Year!
0

REPETITION, CHAOS AND ORGANIZATION!

Follow my blog with Bloglovin REPETITION, CHAOS, AND ORGANIZATION!! I cannot stand having to do things repeatedly especially if I can design a way to make it work better for me. I spend A LOT of time in the classroom making and remaking schedules. It was needed for sure! Changing schedules for changing needs of students, Redoing schedules and choice boards because I put the wrong item on the schedule even after double checking.
RE-DOING the schedules AGAIN!
NOT HAVING THE BEST SCHEDULE FOR A STUDENT - CHAOS!
GET IT STREAMLINED and YOU GET BETTER ORGANIZATION!

I LOVE organization but I do have difficulty maintaining it. But this idea seemed to work for me.

So, if it works better for me - I want to share it with you because just maybe, it will help one of YOU also. Take a look!

A few weeks back I shared with you about a new product coming out. The plan didn't exactly happen as I had planned.
Of course life happens, Thanksgiving came and went  and other product ideas got in my head, but finally I do have it up in the store.
This is something I have used in different ways in my classroom but never put it all together.

In my classes, I served a variety of skill levels, ages, grade levels and disabilities ranging from moderately to significant.  One thing they all had in common over the years was that they could all learn independence in the classroom at some level and in some capacity.

Of course as we worked on increasing independence, more and more students worked on their own schedules. Each child worked with whatever type of schedule worked best for them. I truly operate on an individual basis in my classroom. Some children worked with picture schedules, some with pictures and text and some with just text and occasionally I have that student that can work independently.

Some students carried their own schedule with them, some are mounted on the board, some in notebooks or clipboards. Some are fastened on desks and tables and some were managed by the adults in the classroom.

Many of the children also  have choice boards as well. Some are incorporated into the schedules and others are separate from them. The choice boards give them the options they can choose once their work is complete. This may be an IF/THEN board or a token board or it could just be a board of fun, relaxing or preferred items they can pick from once their work is completed.

With all these schedules and choice boards in the room it can get pretty confusing at times and I wanted a way to keep all the schedules and choice boards in an organized manner so that all adults in the room could access them quickly.
So I came up with a schedule/choice board flip book that is bound with a binding coil. It has removable visual cards so options can be changed quickly without hassle and all the pages can be together in one place for multiple students.


I made multiple copies of the boards for me and also for my paraprofessionals. This way everyone had a copy at their fingertips.
As we all know- schedules and choice boards rarely stay the same for long, so I wanted something that could be modified quickly and easily. Here is what I came up with.
The book is tabbed so you can easily flip to the specific student you want, The visuals are fastened with hook and loop fasteners so they can be exchanged quickly when needed.


 This is an editable product. The 6 tabbed pages can have student names typed in prior to assembly. A prepared title page is available as well as an editable one so you can personalize it. You can type on the tab, use a marker or just add names with label tape.
Above is a picture of some of the 144 visuals I created to go with the first version of the product. There are multiple choice items, school activity cards, and subjects. Some of the items have multiple cards showing variations of the topic such as 1 card showing a swing set with children on it and one card shows an empty swing set. Some of the other variations include activities showing girls or boys doing activities and others show photos of items while others are clipart pictures of the same item.

I would like to hear from you. Pick this item up in my store before the price increases.
 Send me suggestions as to what additional visuals and choices you need to make it work for you. All schools and situations have different activities and or subject names for things. Let me know what YOU need for your tabbed book. As soon I have accumulated additional visual card ideas, I will update the product with your suggestions. You will then be able to download them and any other I add FREE of charge.


You can find this item in my store http://bit.ly/flpbk562 .

Being organized and streamlining everything you can in a special education classroom helps make the entire day run smoothly.

Take it easy and everyone have a great week! The holidays are almost here!

1

READING SKILLS: Main Idea

Today I wanted to share a few strategies and supports that have worked for me when teaching  main idea in my special education classroom over the years.
MAIN IDEA is  finding the information that tells what the entire text or picture is about. It is the message or the point the author of the materials wants to convey.
When teaching main idea I use key words such as WHO and WHAT plus using ideas such what is the BIG IDEA of this story.

WHY
Being able to determine the main idea is one of the basic concepts of reading.
Being able to determine the main point of what read extends into almost every other subject we learn.

HOW
Picture Main Idea
Start at the picture level. Use an easy to understand pictures from magazines, photos, picture books or comic book.  These can be  extremely useful for main idea especially for those having difficulty with the concept.  When working with materials at the picture stage, be sure and include the use of key phrases to prompt the correct answer such as What is happening in this picture?  What is the boy/girl doing? Pictures depicting things familiar to the student are particularly  helpful at this stage such as the one below.


This picture doesn't contain distracting  details such as other people or even other equipment on the playground.
In my store - you will find 2 products regarding main idea. One is at the picture stage and one is at the picture/sentence stage.

Pictures and Word Sequencing
Once the student is successful at main idea in  pictures, try incorporating words that correspond with the pictures. Using a very basic sentence that tells only basic information about the picture give an easy sentence for the student to read and then then tell what is happening in the picture.


As the students skill increases, the sentences can be augmented to include more details.


0

It's Your LUCKY DAY!


    Sunday 11/15 a group of Special Educators are having a Teachers Pay Teachers Dollar Sale.

    Yes, $1. Just like the picture above.

    We have selected products from our stores just for you and are offering them for $1.00


    All You have to do is 3 things.

  1. Spread the word quickly or the sale will be over. 
  2. Go to http://bit.ly/SGThanks  and SEARCH for #SPEDGivesThanks
  3. Purchase all your fav $1 products. 
Hurry - It won't last long because at the strike of midnight tomorrow - it will all vanish.
Sunday 11/15 a group of Special Educators are having a Teachers Pay Teachers Dollar Sale.
Yes, $1. Just like the picture above. 
We have selected products from our stores just for you and are offering them for $1.00


Have fun!


0

READING SKILLS: SEQUENCING

Today I wanted to share a few strategies and supports I have used for teaching sequencing in my special education classroom over the years.
Teaching order, continuance, sequel, consecutiveness is so  important in our world and lives today.
SEQUENCING IS PUTTING THINGS(events, ideas)  IN ORDER.

WHY
Why learn sequencing? It is the basic stepping stone to other more complex skills and concepts in multiple subjects. Just a few places sequencing is imperative to understand include:

  1. Sequencing events in a story
    Sequencing is part of comprehending and understanding what is being read. 
  2. Sequencing is important in learning math.
     Remembering steps to completing mathematical problems, even addition and subtraction with regrouping requires sequencing of steps.
  3. In daily living- sequencing of activities and steps in order to complete activities is vitally important. 

HOW
Picture Sequencing
Start at the picture level. Cards such as this from my Goldilocks and the 3 Bears set with only pictures on them can be extremely helpful in starting to put things in order.
Using pictures from magazines, photos, picture books or comic books are extremely useful for sequencing. When working with materials at the picture stage, be sure and include the use of key sequencing words so the students get use to hearing them. Pictures depicting how to make a sandwich, giving the family dog a bath, planting a flower or the stages of the growth of a flower all make excellent places to begin.

Pictures and Word Sequencing
Once the student is successful at sequencing pictures, try incorporating words that correspond with the pictures, such as with familiar stories.  Below you will see a page from my Goldilocks Sequencing Card Pack


First I have included a picture only card and then next to it the same picture is accompanied by the text for that picture. This way the pictures can be used to help put the cards in order when reading the text.

Sentence Sequencing

Following pictures and/or picture and text, putting sentences in order would be a logical next step.
First start with 3 sentence stories that focus only on first, then, finally. Cut apart sentence stories and have the students place them in order.
The example above is a 3 sentence store about Dad working on his car. It uses the keywords of first, next and finally. Once you know a student can read the text of this mini story, you can cut apart the sentences. Then you put magnets on the back and cookie sheets or use hook/loop fasteners to fasten them at a learning center. The students can then put the sentences in order and get them checked. 

From here you can of course increase the difficulty of the text and  add pictures to this.  
 Here is an example of 2 stories. They are very
simple with basic sight words. Each story has limited illustrations that depict what the story is about. Each story also has 3 multiple choice sequencing questions underneath. The questions can be used with the text enabling the student to look back at the story or you could fold the page so that only the questions are visible.

Below is an example of visual picture cards that match these two stories. They can be used for extra prompting if needed to determine the events in the story. When the story is read to the student, the picture card could also be used as the answer cards the student used to sequence the story. This sequence packet is  available by clicking here.

Increasing text difficulty and adding details to the story can be extremely beneficial in building  sequencing skill difficulty.
Thanks for joining me today as we talked a little about the topic of sequencing. 


1

Little changes in the classroom can have BIG effects

Today I thought I would share with you a little change that made a big difference for me in my classroom. Sometimes its the little things you do in the classroom that can make teaching life easier or help things go smoother in your classroom. And wouldn't we all like that?
In my classes, I served a variety of skill levels, ages, grade levels and disabilities ranging from moderately to significant.  One thing they all had in common over the years was that they could all learn independence in the classroom at some level and in some capacity.

As teachers, we spend a lot of time not only assessing students, but assessing the workings of the classroom as well. I realized during one of my own assessment times that classroom time was being wasted looking for, and retrieving schedules or choice boards for students.  I found that all the adults (paraprofessionals and teacher) were needing to take time away from more important things to locate visuals needed by the students.

You know how fast things move in a classroom. Keeping things convenient and within reach was imperative. The more children I had with serious behavior issues, the more important this was.
 In my self contained classroom, I designed it so the students moved around the room from station to station and from adult to adult. This way, each student worked with every adult throughout the day. Using this setup, every adult needed each child's schedule or visuals set and they needed to be able to reach it quickly without fumbling for it or passing it from adult to adult. It encouraged the students to use/read their schedules and learn to move within the room.

One way I came up with to help with this schedule/visual problem was a tabbed visuals book. Each child's schedule or choice board  is put on a page in a tabbed book with their name on the tab.  I made a copy of the entire book for each adult in the room and even hung copies near the exit doors for when we were lining up or exiting the room.

 The pictures below come from a prototype a made for a product I currently working on to sell in my TPT store. The actual product will be up within the next week and I will announce it on the blog.


 You can see in the cover page picture,  the book has tabs on the bottom of the book with student names on them. 

The page above is Sarah's choice board. When she completes her work at each station, she is allowed to have a quick reward time and these are some of the things she can select. 


John's page (above) and Brian's page (below) are schedule pages. It shows them what they are supposed to do in the morning all the way up to lunch but are individualized according to what stations they go to. 


One of the best changes I made to the schedules and choices booklet is that is adaptable. Who has ever known schedules and choices to stay the same? So the book needs to adapt to needs quickly.
Each piece in the book is attached to the book page with hook and loop fasteners. This way it can be changed quickly and as often as is needed.
Making multiple copies available to each adult in the room and around the classroom made a big difference in my class and freed up time that can be well used in more important ways than looking for materials.
Thanks for stopping by the blog today! Be sure and stop by next week when the Schedules and Choices booklet will be available for sale in my store.


3

Comprehension skills: WH questions


Teaching comprehension skills to students with disabilities is often a very challenging concept to teach.  We all know that comprehension is the reason we read. We aren't really reading without understanding what we read. I have come across many students in my years of teaching that have  excellent word calling or decoding skills, but  extremely limited comprehension skills. It is often  easy to assume that students who can  read words are understanding what they read. I  have had more children that are excellent word decoders or word readers than I have had kids who have good comprehension in my special education classes. How do we help them?

Today I want to start a series of posts on comprehension skills in the special education class. Today I thought we'd start where I usually start with my students - the WH questions, WHO, WHAT, WHEN, and WHERE.

Here are 3 things I do when teaching WH questions.
1)
First, start working with pictures then gradually move to simple sentences using the WH questions. I always start with a simple picture. Select a basic picture without  extraneous activity in it. Can the student express in some way what is happening in the picture? Who is in the picture? What are they doing?  Using a picture that depicts a common activity in the student often takes part in is very useful.  A picture of student saying the Pledge of Allegiance or playing outside at P.E. What is happening in the picture? Where is the person in the picture? These are also good questions to pose and  can all lead you to determining where the student is functioning in comprehension. By eliminating the text and using pictures, you are focusing just on the basic information.
2) Use of a visual prompting card for the information you are asking is often beneficial. If you were asking about who is in the picture then a card with the word who and pictures of people might help them to understand what type of information you want them to give you. If you were asking about WHEN something is happening in the picture for instance if it is a picture of somebody eating breakfast then on the prompting card you might have a calendar or a clock or an hour glass in order to queue them in a little bit better regarding what information you're asking for. Here is an example of one I have used.


For the WHAT question I use a visual of things such as desk, pencil, backpack.  For the WHEN Question I use a visual of a clock, a calendar, a watch to symbolize that when answers are going to address time.
 Check it out in my TPT storeWH Reading Comprehension
You can get your copy here 

3) Use picture cue cards for answers to the questions that you're asking for the comprehension. For instance,  if you're asking who is getting on the bus for a picture of a person getting on a bus then you might have 2 or 3  choice cards from which the student can select the correct answer. This is extremely helpful when you have a student with limited verbal ability or often with students who have issues with extended processing time.

Next Comprehension skill:
Sequencing with first, next, last

Thanks for dropping by.
Hope to see you next time

0

Working with Non-Verbal Students - AUTISMATE PART 1

Working with non-verbal students is often very challenging to say the least. Several of my students on the autism spectrum have been students with no verbal skills at all or extremely  limited verbal skills.
Finding ways for them to communicate with me and their peers in a classroom setting always proved very challenging.
There are many good options available to work with students with little or no verbal skills.
My goals when working with non-verbal student is that I always want to make them as independent as possible, and give them the tools they need to make them an in integral part of the classroom.
One of the tools I have found that meets all these criteria is Autismate. Autismate is a program by SpecialNeedsWare that is available for use on iPhones and iPads.
Being able to use it on devises such as these makes it extremely convenient to use across multiple environments such as school and home, or even community.
This program is so immense in what it can do for people with disabilities!  I have used it with a student in my class for 2 years, who has good receptive language with extremely limited verbal skills. I have created personalized schedules, stories, and communication boards specific to his needs. It helped him learn to complete his arrival morning schedule when entering the room totally independently. It helped him progress from having someone behind him at all times verbally prompting him to having him carry around the mini iPad as he completed each step to being able complete his arrival procedures all by himself.
Today I would like to share with you a little about this wonderful program. What I share today is just the tip of the possibilities that can be done with this program. In order to get a more in-depth picture of what this program can do, please be sure to visit, AUTISMATE . Here you can download a 14 day trial.
One of the first things I did was create a choiceboard for my student so he could get use to using the iPad as a tool and not a game board. Through some generous people and DONORS CHOOSE I was able to secure the funds needed to purchase a mini-iPad for use with Autismate so that it was a tool and not a toy to the student.  The iPad was a favorite item of this student  and proved to be easier than I thought to teach him to use one iPad as a tool or instrument and others as a reward.


The first  activity I set up was a board for my student to select his choices he wanted to work for when finishing a work task. I started with his most preferred item and  put only that item on the screen. This gave me time to teach him how to use the program.
Every time this student wanted to use the trampoline, he had to ask for it using his iPad. The picture I used was a photo of him jumping on the the mini-tramp and verbalized, I want to jump on the trampoline.
Over the course of a month, with consistent implementation, he learned to use the program and at the end of the month was able to get the iPad independently, open  the Autismate program and select his choice board option.
Thanks for joining me today for this first part of a series of posts on Autismate and other ways to work with nonverbal students. Join me next Wednesday for another segment


3

Edmark or PCI: Comparing Two Reading Curricula

When you look at  reading programs for special education classrooms, especially those for students with significant disabilities, two programs immediately pop up. So please join me as we take a quick look at both of these programs.
One program is Edmark Reading Program. It has been around since 1972 and is well liked by many special education teachers.  Another program that comes to mind is PCI Reading Program. This program is fairly new starting around 2009 . Both of these of these programs are excellent materials to use when teaching reading to students with disabilities. Both have significant strengths and only a few differences.
As a Special Education teacher of students with significant disabilities for the last 12 years,  I have used both of these program extensively and have seen both of them work their "magic"  in teaching students with disabilities how to read.  I say "magic" because it almost seems like that sometimes. It NEVER gets old watching a child's eyes light up when they realize they CAN READ a word for the first time.  Its a lot of hard work, of course on the student and the teacher's part, but there is THAT moment when, that" light bulb" goes on and you can almost see it turn on within the child. They are proud of themselves and they WANT to learn more.
A lot of times when you speak with teachers, you find they have great allegiance to one or the other of these programs. Sometime teachers have a choice as to what program to use but other teachers must use what is provided to them by their school or district.
I am different. I adore both, have used both extensively and feel both have their place in our world of working with students with disabilities. I used Edmark extensively for many years until PCI Reading was introduced in our county and we were instructed to use PCI as our primary materials as it followed our standards closely and use Edmark as a backup, supplemental program.

WHO ARE THESE PROGRAMS FOR?
Before we start, lets start with a couple of similarities between the two programs.
Both are designed for use  and work well with students with developmental disabilities and autism as well as students with significant learning disabilities.
They both have extensive research to back their use.
They both use an errorless approach to teaching the materials to students. This means student have a high rate of success and can see themselves as successful readers. Built into both of them is a spiraling repetitive teaching sequence of the content that helps ensure students a successful learning experience. They both focus on giving students a solid foundation of common base vocabulary upon which students can build their reading skills. Both PCI and Edmark teach a highly structured set of words with sequential teaching steps broken into small increments to increase the learners' success. Here is a quick look at a few factors of both programs.


Let's look at each one separately for a moment.
Edmark
When a student successfully completes Level 1, they have usually progressed from nonreader to being able to read approximately 1.0 GE materials.
The words taught in the Edmark program include words that can invoke an image. Words such as ball, car, airplane, him, you, milk, and zoo.
The approach used in Edmark is basically a sight word approach is an alternative to learning to read with phonics.
The systematic and repetitive program steps allows students especially those with significant disabilities to become successful readers
Edmark has a software component that once taught, can often be used independently by  students. 
Edmark also has a manageable systematic record keeping with lesson by lesson and word by word tracking that provides way to record reteaching.
Sight words used in the program are primarily for grades K-3 but that doesn't mean the student will be reading on grade level 3 when they have successfully learned the words.
The Edmark Reading Program provides motivation by breaking learning into steps that ensure even the poorest readers achieve over 90 percent correct answers. This approach eliminates incorrect responses and leads students to see themselves as “readers” rather than “nonreaders.”
Four instructional formats are used throughout the program: Word Recognition, Direction Cards, Picture/Phrase Cards, and a Story Book. Level 1 teaches the student 150 basic sight words plus endings (-s, -ed, -ing). Level 2 extends the learning by teaching an additional 200 words, plus compound words.
Basic literal comprehension skills are taught through pictures, and directions cards.
Edmark's comprehension is very basic literal comprehension skills and very useful for beginning readers. Here is an example of a Level 2 comprehension lesson in Edmark.


PCI
The PCI Reading Program works on a 5 word cycle then assess. This program includes errorless discrimination, positive reinforcement, a controlled vocabulary with tactile reinforcement. It also has a great software component.
It systematic record keeping is very concise, easy to track, quick to complete and tracks reteaching extremely well.
PCI teaches 140  words in level 1 and the students can read a book after just 5 words are mastered.
The words taught in PCI come from the Dolch and Fry lists and include more words that cannot be tied to an image in isolation, such as is, as, do, to or as well as more common words that can be connected to an image making it easier to remember.
PCI includes phonics and phonemic awareness in the teaching of their materials.
One of the places these two programs differ is in the treatment of comprehension, phonics and phonemic awareness. Level 3 in PCI takes the words learned in levels 1 and 2  and expands that learning into word analysis, and decoding while still expanding the students vocabulary and controlling the words in what is read. Level 3 also introduces students to new genres of nonfiction, and poetry while integrating writing, fluency and comprehension.

Here is a video showing you some of the components in the PCI Reading program.While this video came out in 2009 when Level 1 was brand new, they now have levels 2 and 3 out.


19

Apps in SPED

GOODNOTES

Has anyone  used the app GoodNotes in the classroom?
I know this is been on several blogs, but I thought it deserved another look because it can be such a versatile tool in the classroom.
 When I first read about it I downloaded the app and I now have several sets of worksheets in the app and have been using with my kids for a while now and thought I would share my experiences with you about it. Below you can see screenshots of my bookshelf in the app where I have added a few of my teaching worksheet sets.

When you initially open the app you view the  empty shelves of your bookshelf.  Select  the  + button and you open an entire world of possibilities. With GoodNotes, you can create your own notebook and take notes, import notes and worksheets into the product.


Selecting the + produces a blank sheet of paper.  You have choices of lined, unlined, grid paper as well as music paper. I find the line paper  particularly useful when having parent conferences or phone conferences to take notes with. You can use a stylus or just your finger, making it convenient when you get those impromptu phone calls from parents and don't have paper/pencil. The notes you take with this can then be printed or exported. When you export, you can email, save to places such as SkyDrive, Google Drive, Box , or  Dropbox.
My favorite thing to do with GoodNotes is to import worksheets for my students to complete on the iPad.  Select the + button once again and choose your preferred online storage option as your source and download PDF files and even PowerPoint files. I have had a few minor problems with the PowerPoint files. I think it depends on the size. Some of the PowerPoint files downloaded fine and then were converted to PDF by GoodNotes. The possibilities are endless as to what this app can do for you in the classroom.
One of the biggest advantages for me is using it is as an incentive for students to complete their work. Some of my students will complete anything when its on the iPad! What about YOURS?

This extremely versatile app lots of great features, but I am just going to highlight a  few of the most useful to me. Here are some of my favorites.
Shape Recognition
Turn on shape recognition, select the pen color and thickness you desire and you can circle important items on the screen. When you hand draw your circles, lines or boxes on your notes, it immediately changes them into proper shapes.
Text Boxes and Images
When creating or presenting a document, you can add text boxes and images to your document. I can make a worksheet of math problems and add clip art or photos to it, straight from the iPad camera or from an online storage location.
Lasso Tool
Move things around on your worksheet/ notes using the lasso tool.

 In the example of the Choice Board above, you will see several of the items circled, but prior to circling the grapes on the bottom row, I used the SHAPE tool and it immediately turned my hand drawn circle around the grapes to a formal circle.

In the example above I imported some task cards for number recognition. You can see where different colors of marker were used to select the answers for the task cards. A great opportunity for saving paper, awesome incentive for those kids that hate worksheets ....the possibilities are endless. This is counting activity is available in my TPT at  http://bit.ly/spedspot2


Try GoodNotes! Its extremely versatile!
There is a free version and a paid version.


0

BONUS SALE!!!


Big BONUS one day sale 
Wednesday, Aug. 19 on Teachers Pay Teachers.
My entire store is on sale 20% off including some new items. Get them now
for Back to School and save up to 28% using the CODE: MORE15 at checkout.

 CLICK

0

1-2-3 of Math in the Special Ed Classroom


I like teaching Reading to my kiddos, but I LOVE teaching Math!
I think its a favorite of mine because Math is more hands on.
So many parts of math are visual or can be made visual,  making it a little easier for kids to grasp it,

Today I want to share with you a few things that have worked for me  teaching math with my students.


ROTATION
There is a multitude of  levels in a special education classroom, its often difficult to work in whole group or even small groups so I form a rotation schedule for the math portion of my day. I like to work with kids in Math on an individual basis so I started using a rotation schedule.

 I usually designed the math class to operate on 15-20 minute intervals. Keeping the time segment to 20 minutes or less, makes it long enough to teach substantive skills yet short enough for young minds attentions issues.

1.
DIRECT INSTRUCTION
I work with each student daily. Part of my daily math schedule is a 1 on 1 time with each child. I do a skills assessment at the beginning of every year.  This gives me an idea of what skills they have retained over the summer, what skills they've gained and where we need to start this year.  For direct instruction, I primarily use materials I have made specifically for my students, but in addition to those materials, I also  have used Touch Math. If you aren't familiar with it, Touch Math is a supplemental program, that has been around for about 40 years. In my opinion working with Touch Math and its multi-sensory approach makes it perfect for kids in special education classrooms. The multi-sensory piece of the program is primarily a patttern of  dots and rings called Touchpoints.

One of the first things you teach in the program is how to use the Touchpoints™. There is a specific sequence to touching, saying and counting for each numeral. Once this is learned, the world of math is at the fingertips of many students that once had difficulty with it. In Touch Math, dots are touched and counted one time and a dot with a ring around are counted once for the dot and once for the ring around the dot. Addition is taught using the count-on strategy and subtraction is used with a counting backward method. They also teach multiplication as well as money. 
Be sure and check them out at Touch Math .

2. REVIEW & PRACTICE
First thing I do is set up a way for my kids to practice their skills on a daily basis.  Sometimes we  called them Bee Boxes, other years we call them Math Boxes or Task Boxes, but the purpose is the same. The students rotate through the boxes daily practices through short activities or "games" the skills they are already been taught but need to revisit to maintain mastery.  Each math box had a different skill or a repeated skill at a different level. Bee Boxes were operated so that no child did the same skill twice in a row in one week. The best way it was managed was when the skills were repeated for 2 days, on Wednesdays and Thursdays, a second set of skills was practiced then on  we had  a review day on Friday.


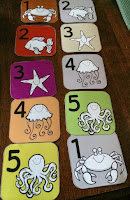
One of the schedules I used was this sea creature schedule. Each Math Box was a sea creature and the station sign (seen below, left ) was over the table or area where the Math Box was located. Here's an example of what my Math Stations might look like.
Station 1 was teacher instruction, 
Station 2 was putting numerals in order, 
Station 3 was counting items and labeling, 
Station 4 was Working with a teaching assistant, 
Station 5 was determining more/less of a group of items 
 Station 6 was putting numbers in order.


Each student had a set of schedule cards such as the ones (Right). The picture and the number on the schedule card told the students which station to go to and the order of the line of schedules told them which order to do them in. As you can see in the picture on the right, the centers are rotated by moving the top one down to the bottom. These schedules are available in my store all ready to print and laminate. Check them out here:
Visual Task Schedules
Some of the items I put in my task boxes are things such as task cards like the ones below. When used as task cards the 4 cards are cut out separately and laminated. Then the students can use wipe off markers or clothes pins to mark the correct answers. The picture below shows my task cards before I cut them apart. I took each page and put them on the iPad the classroom has. Then the students can write on the iPad with their fingers to circle the correct answers. This leads me to the last section of my Math class rotation.


3.
TECHNOLOGY
The 3rd section of my math class is devoted to practicing the math on the computer and/or iPad. I was very lucky to have 3 iPads and 4 computers in my classroom. So I utilized them everyday but using program such as ScootPad which is a website that provides personalized learning in both reading and math. The personalized portion, of course was of great importance since my kids were not working on grade level so I need to be able to manage exactly what they work on. ScootPad has a free version which works just fine and a paid version which is awesome.
Another good option for working on Math with technology is MobyMax. TouchMath also has software that goes along with their lessons.

Hope you have found some tidbit of new information that can help you in teaching Math n your class.

1

Fire Drills- Can Be Frightening!

When I was a kid, fire drills were a welcomed interruption to the day. However, fire drills  can be a very difficult thing to students with disabilities.
Fire drills, especially for those on the Autism Spectrum or those with auditory sensory disabilities, can be a frightening event that is dreaded sometimes for days in advance and whose effects last way beyond the 15 or 20 minutes a routine fire drill lasts in schools.
Some of the most common behaviors I had in my classroom, were  screaming, crying, hiding under furniture and even escaping the situation entirely by running away. I had one student that could anticipate when the fire drills would occur and would start crying, attempting to run away and scream prior to the drill.
For some children its the loud sound of the fire drill, for others its the disruption of their normal schedule that frightens them. Some children don't know what to do or what is expected of them during a fire drill.
Behaviors such as these whether  they occur before, during and after a fire drill  can be a major strain on the teacher, the classmates and staff and of course the student.

Other students in the class are often negatively affected by the behaviors and staff is diverted from you what you need them to do in order to tend to the screaming, yelling, hiding or escaping. It takes a toll on everyone.  Fires drills are an important part of safety awareness and preparedness. They are not something we can abandon.

What can we as teachers do to help children when this happens to them?

One thing that can be important in the classroom is for the teacher to work with administration.

  •  See if  you can be informed about the fire drill ahead of time. The administration at my school puts it in our weekly teacher bulletin and calls me 15 minutes prior to the drill. This gave me some time to put some calming strategies into place with the students.
  • Go over the rules of a fire drill. Walk the class through the process of a fire drill, step-by-step.
  •  Role play what will happen during a fire drill.
  • Desensitize the student to loud sounds such as the fire alarm. Try using an app on your smart phone or tablet that has loud sounds on it. There are even some apps that have examples of fire drill alarms. Start off with the sound soft, introduce it to the student. 
  • Try doing mock drills with a lowered fire drill sound. As the student becomes more acclimated to the lowered sound, raise the sound level up and continue mock drills. Continue doing this until the sound is at full level.
  • Purchase an alarm such as a smoke detector, and follow the same procedure as above for desensitization. Muffle the sound, then progress as the student gets used to the sound.
  • Take the student outside prior to the alarm going off. Doing this could alleviate the behaviors that occur during the fire drill as the alarm may not be as close or loud, as it would be in the classroom. This option should really only be a stopgap solution. We need to be teaching the students what to do and how to be safe in emergency situations.


One thing that has worked in my classroom and in many other classrooms is to use Social Stories. Social Stories were created by Carol Gray  in 1991 to help teach social skills to people with autism. They are stories with short descriptions of situations with statements about what is expected of the student or what the student can expect.

Here are a few suggestions for using Social Stories for situations such as fire drills in the classroom.
Use of Social Stories

1.   Prior to implementation of a new social story, be sure to communicate the new task beintaught to all the people involved in your student’s program. Provide a copy or share the steps of the task being taught in the story to those professionals working with the  student so everyone is approaching the task in the same manner.
2.   Introduce the book to the student as you would other literary selections (i.e. look at the cover, discuss it, look at the pictures. Adapt as necessary for your student. 
3.   Read the story aloud. Reread the story on a regular basis so you can review the steps and the student(s) become very familiar with what is expected. 
4. After the student becomes familiar with the book and its content, send a copy of the book home with the student. Integrate the parents into the teaching process as well by sharing the book with them.
5. If you do practice fire drills as I  have done, also review the book immediately prior to there drill practice as well as on other days to make sure the information presented in the book becomes second nature.  Review the book as necessary to keep the steps fresh and supplement the teaching with the visual schedules and step poster.

 Check out the revised social narrative.
Click the pictures to visit my store.


7